

How To Make Davinci Resolve Playback Smoother
Stormy atmospheric condition and conclusion making
Remember the days before GPS? The not-so-good onetime days, dorsum when paper maps and outdated route signs were the but way to find new places?
For those of you who never experienced life before Google Maps and AI voice assistants, allow me describe what it was like. You lot were completely dependent on your own sense of direction, your familiarity with the route, and your ability to clearly see what was around you.
This actually worked ok as long as conditions were articulate and you already knew how to get where you lot were going.
But as soon as the sunday went downward or the weather turned bad, your ability to navigate brutal off a cliff (and then did your car if you weren't careful). And the worse the conditions, the harder it was to make decisions about which manner to get.
For mail professionals, that's not too different from trying to brand creative decisions without real-time playback in your NLE.
Think well-nigh the last fourth dimension you had to cutting, form, or mix without smooth playback. Not only was it deadening and frustrating, but it likely hampered your creative decision-making. Choosing the best take of an player'due south functioning, or deciding where to cut a scene based on emotional cues is difficult when you lot can't watch a video smoothly.
When it comes to finding your manner in a timeline, real-time playback is just as important equally GPS when driving in a storm. Without clear vision, it'due south challenging to make effective creative decisions for your film.
In today's article, I'll show you the five best ways to optimize operation in DaVinci Resolve, so your creative decisions are as shine and real-fourth dimension as possible.
How to measure out playback performance
Earlier you lot can optimize the playback performance of DaVinci Resolve, y'all need to know how it'due south doing already.
In Resolve, there is a Performance Indicator Lite and a Frames Per 2nd (FPS) display in the top left corner of the main viewer window.
As you might have guessed, the Performance Indicator tells you whether overall system resources tin can obtain real-time playback, or a smooth playback experience, and the FPS display tells you how many frames the arrangement can evangelize every 2nd.
A dark-green performance indicator means the organization is achieving real-time playback, while a cerise indicator ways that there are not enough system resource available for real-time playback.
Note: A scarlet light might signal a limitation on CPU, GPU, or storage resources, or any combination of the 3.

Luckily, if you discover yourself in the uncomfortable situation where you can't deliver real-time playback, there are a number of features and options available to enhance your performance without whatever change to the final consign quality.
While information technology may seem redundant to have multiple features for what seems similar a similar purpose, each feature is unique and useful in different situations and hardware configurations.
1. Performance Fashion & other playback tweaks
Performance Fashion is a fantastic feature that was recently added to DaVinci Resolve.
It intelligently analyzes your reckoner's hardware configuration and automatically adjusts Resolve'due south paradigm processing under the hood. This delivers smoother playback without sacrificing the resolution or bitrate of the final output.
In other words, Functioning Mode gives yous better performance and a smoother artistic experience without lowering the quality of your final video, even when your workstation is a scrap out-of-date.
Yes, precipitous-eyed finishing artists and colorists may discover a slight reduction in visual quality in the onscreen viewers, merely Blackmagic gives us a few controls to tweak Performance Mode.
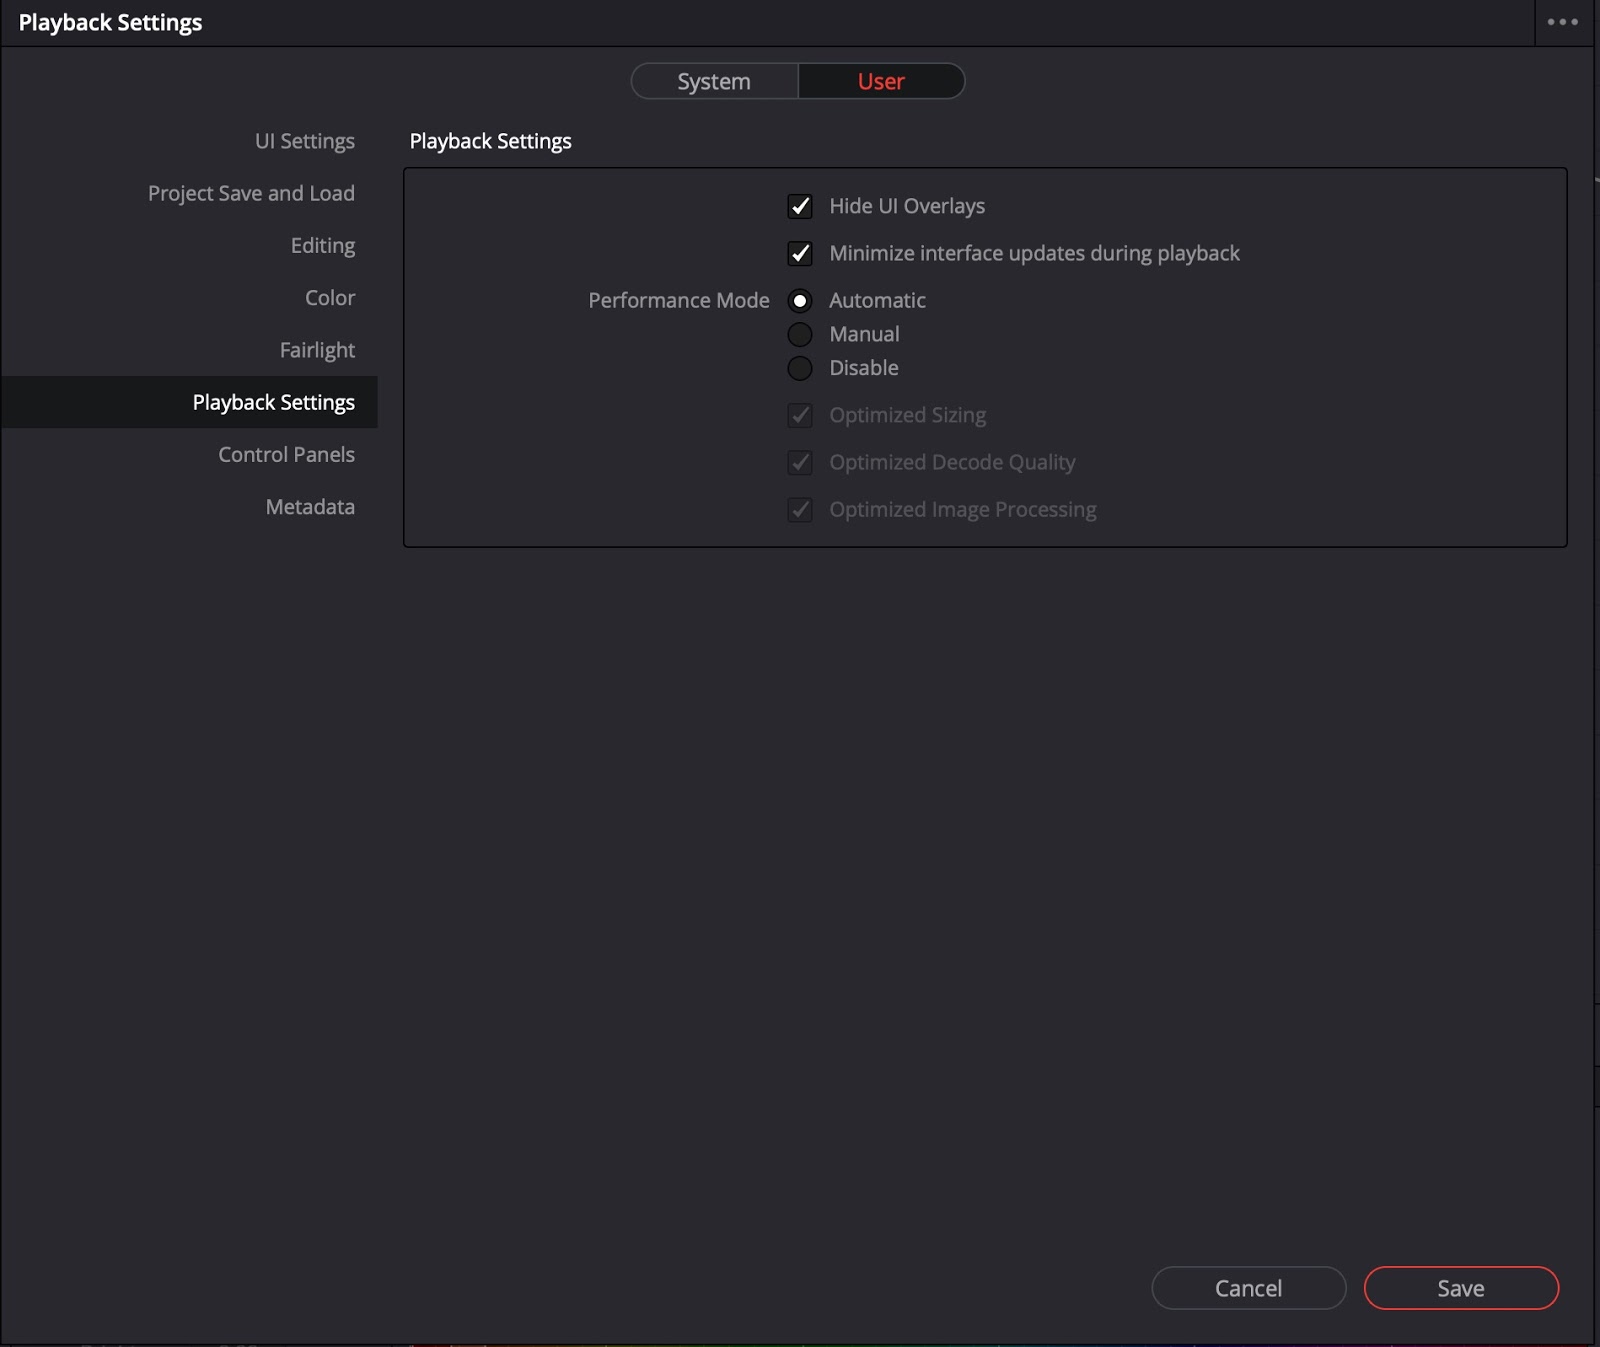
Past default, Functioning Mode is automatically enabled, but you lot can adjust or disable it entirely in the Playback Settings tab of the User Preferences menu (DaVinci Resolve > Preferences > Users > Playback Settings).
I recommend two useful settings in this menu called "Hide UI Overlays" and "Minimize interface updates during playback." These settings sacrifice on-screen controls (such as mouse, power windows, and carve up-screen controls) during playback, which can usually squeeze out a few extra frames-per-2d from the GPU.
One other important tidbit to know. While Resolve and Resolve Studio are very like, Resolve Studio utilizes improved handling for mutual compressed codecs such as H.264 and H.265 and supports hardware acceleration.
This can significantly speed up playback, transcoding, and exports of those formats. But this improved performance is not included in the free version of Resolve, which might slow downwardly performance slightly if you lot're using those codecs..
2. Proxy Mode
Get-go, permit's clarify, Proxy way is not for the typical "online/offline" proxy workflow.
On the opposite, Resolve's Proxy mode temporarily reduces the processed resolution of an entire timeline, but without impacting the actual assets or sequence settings.
It'due south like irresolute the timeline resolution within Project Settings from UHD to HD while working (edit, colour grading, etc.) and and then switching back to UHD before terminal output. All your assets and effects are even so UHD data, they're just existence processed as if they were HD during playback.
Since DaVinci Resolve was designed to be resolution independent, you tin make these adjustments to the project without fearfulness of losing nugget/sequence quality. Then don't worry, you tin can use Proxy Style without information technology throwing off your finely-tuned, shot-specific adjustments, like keyframes, power windows, tracking, etc.
Note: Temporarily changing the timeline resolution is substantially similar making your ain custom proxy fashion, if you want more command. Just don't forget to alter information technology dorsum before render.
The controls for Proxy Fashion via the Playback carte du jour, where y'all'll find two options: Half Resolution and Quarter Resolution.
I recommend trying Half Resolution first to meet if y'all become a green GPU Status indicator during playback. If that'southward not enough, Quarter Resolution volition virtually certainly do the fob (unless yous're working with 8K RED Helium footage).
Quarter Resolution may look a flake blurry, simply shine playback is usually much more important to your creative decisions than the actress pixels.
Unfortunately, if your specific functioning limitations are due to your source media, Proxy Mode probably won't be much help.
Fortunately, Resolve has other tricks for just this scenario.
three. Create optimized media
Optimized Media is basically Resolve's equivalent of offline proxies.
It takes the original assets, and creates lower-quality versions that you work with, before returning to the original quality avails before output.
This is especially useful if you are using computationally-intensive formats, such as heavily compressed H.264/H.265 (mirrorless cameras, drones, and cell phones), loftier-resolution raw (Carmine, Blackmagic, Arri cameras), and even OpenEXR or DPX image sequences (like are used in VFX workflows).
Dissimilar a lot of proxy workflows, Resolve automatically manages the Optimized Media process without much user input or technical setup.
Just right click the clips you'd like to optimize so select "Generate Optimized Media." Resolve volition intelligently select the best resolution for the proxy media (based on the timeline resolution), and so create the proxy assets direct on the scratch disk.
Yous tin even utilize a Smart Bin to intelligently sort through media to aid y'all optimize certain media, such as Scarlet and CinemaDNG camera raw files.
The best part is that in that location is no need relink the original avails earlier output. Resolve's process takes away most of the hassle generally associated with proxy workflows.
You can easily switch back and along between the original (non-proxy) source media and the optimized (proxy) files via the "Utilise Optimized Media" toggle nether the Playback Bill of fare.
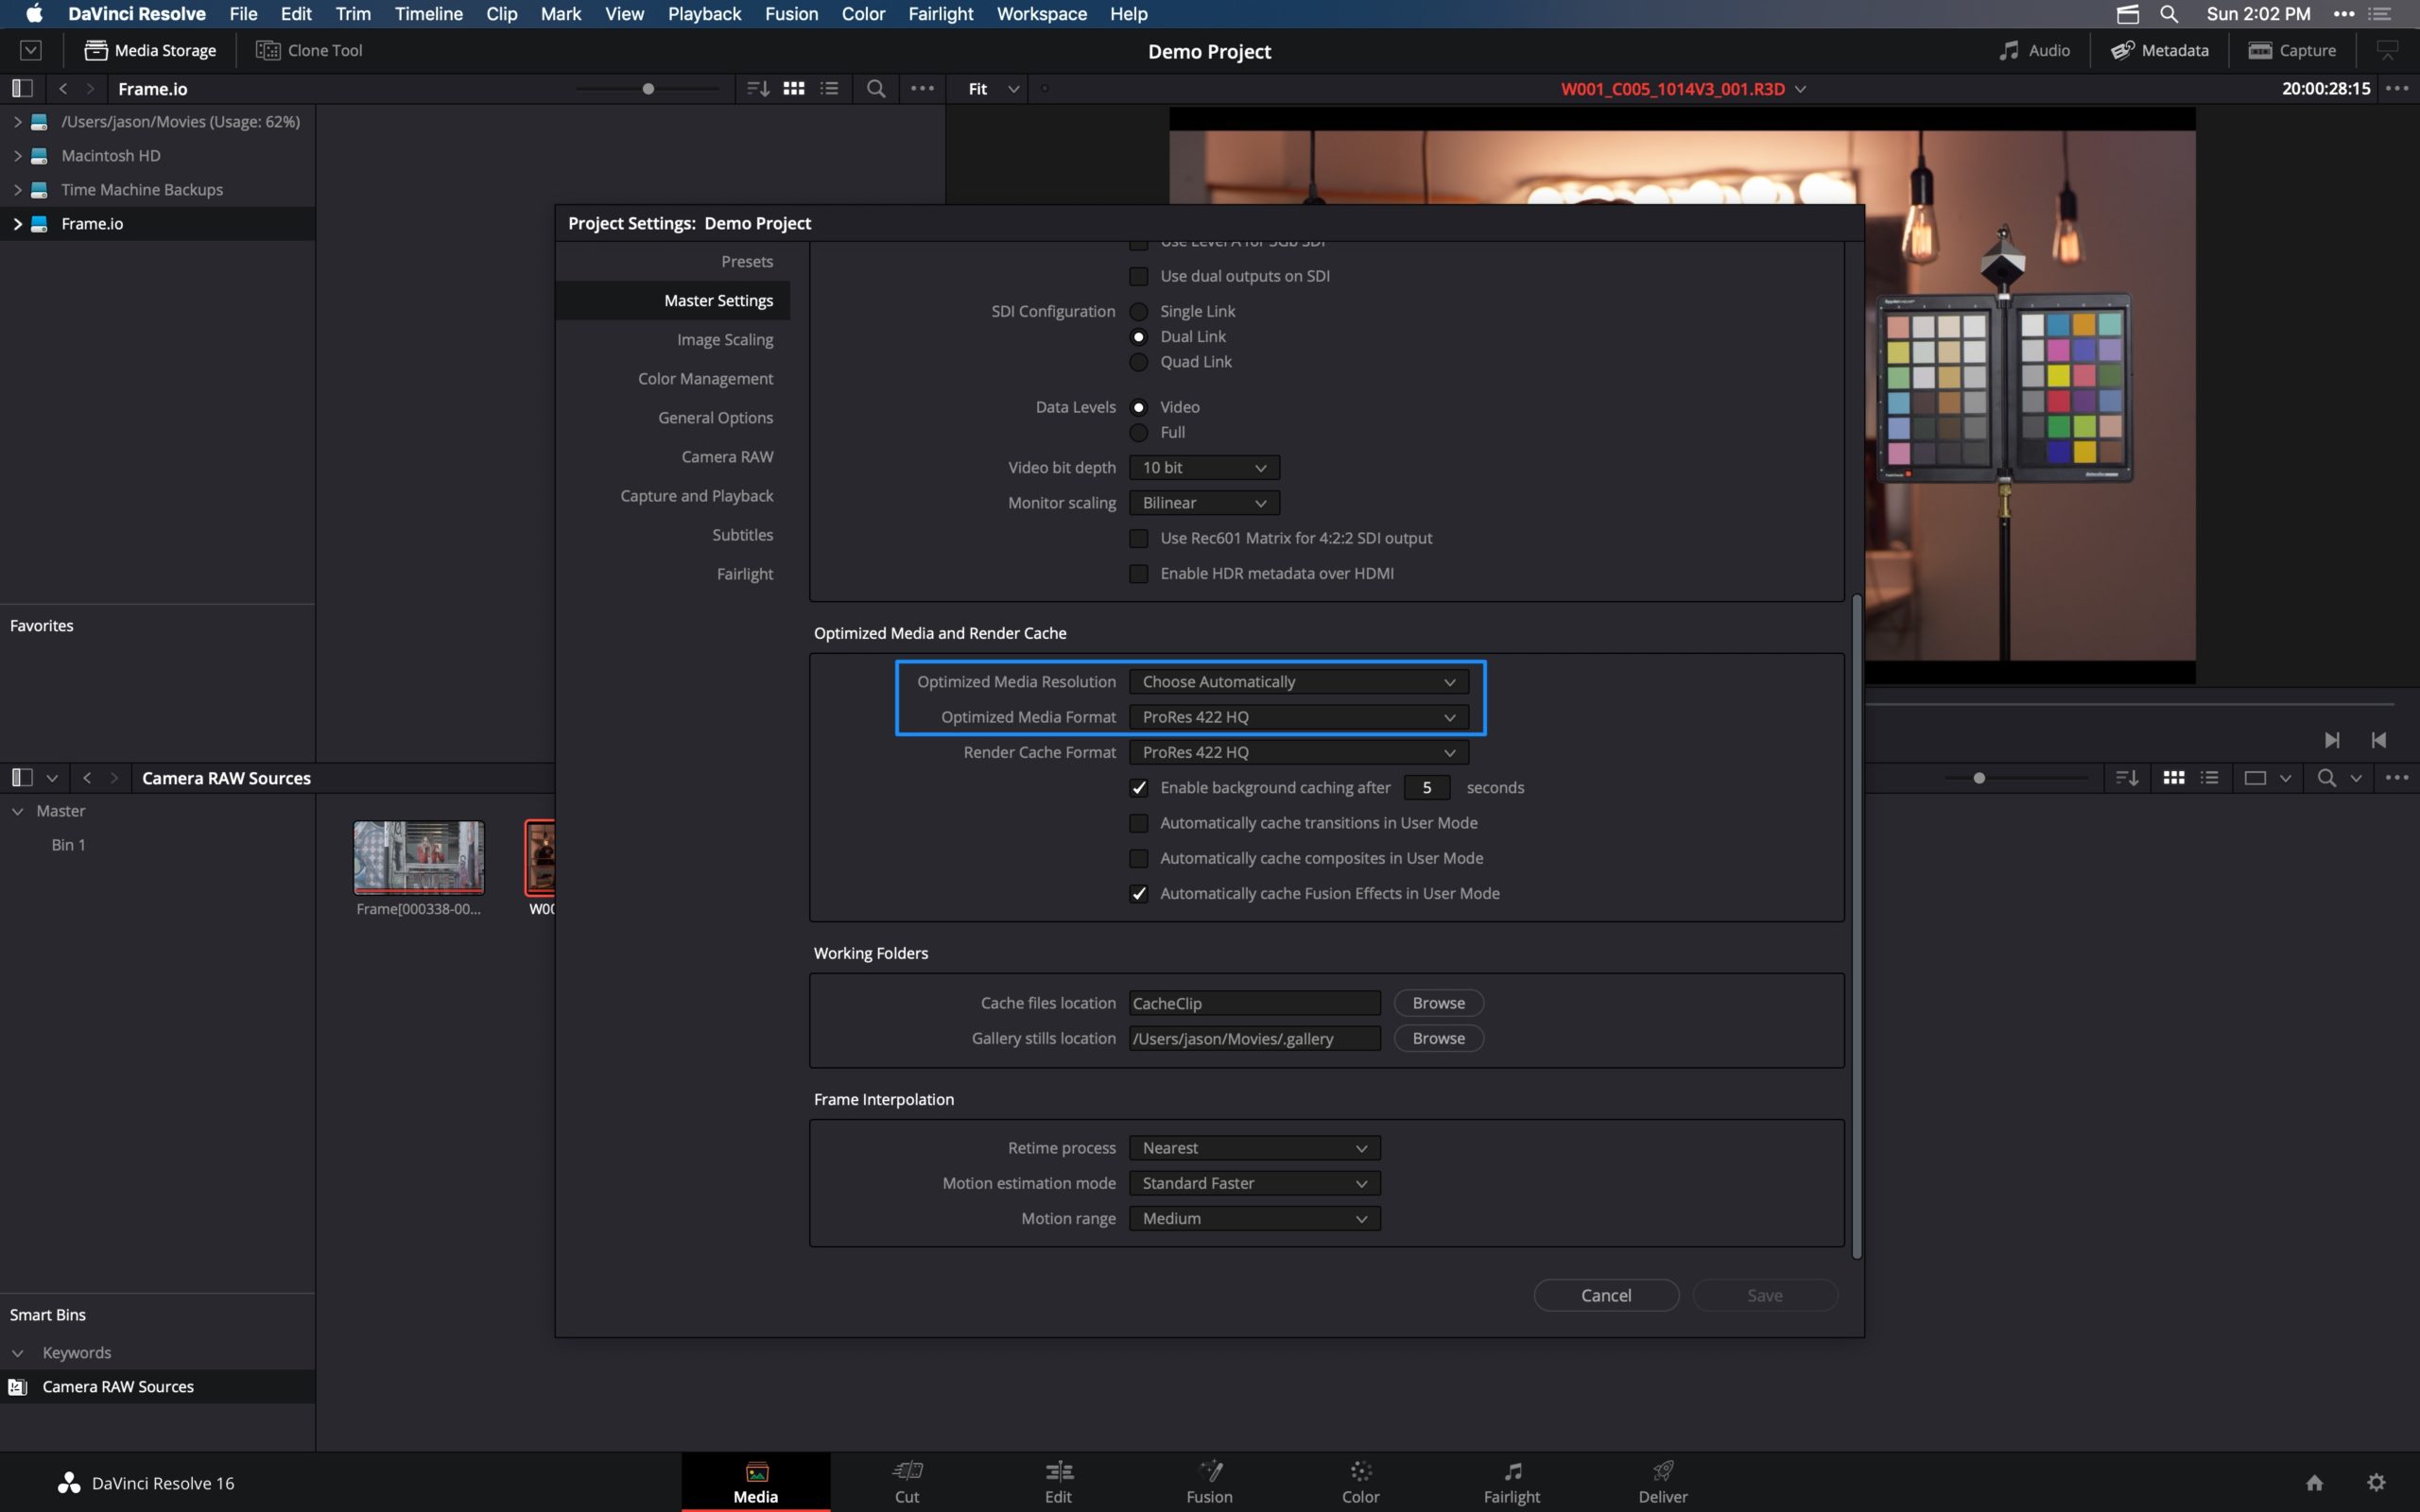
If you'd like to customize the options used to create your optimized "proxy" media, you can practice that in the Project settings (Project Settings > Chief Settings). Like other proxy workflows, y'all can manually select the resolution and codec used, which gives yous much finer control of your workflow.
For example, if yous're utilizing raw camera sources and desire to start preliminary grading on the optimized files, you can specify ProRes 4444 or DNxHR 444 to avoid clipping/data loss. That volition give you lot plenty of room to explore your grading options without the computational burden of raw.
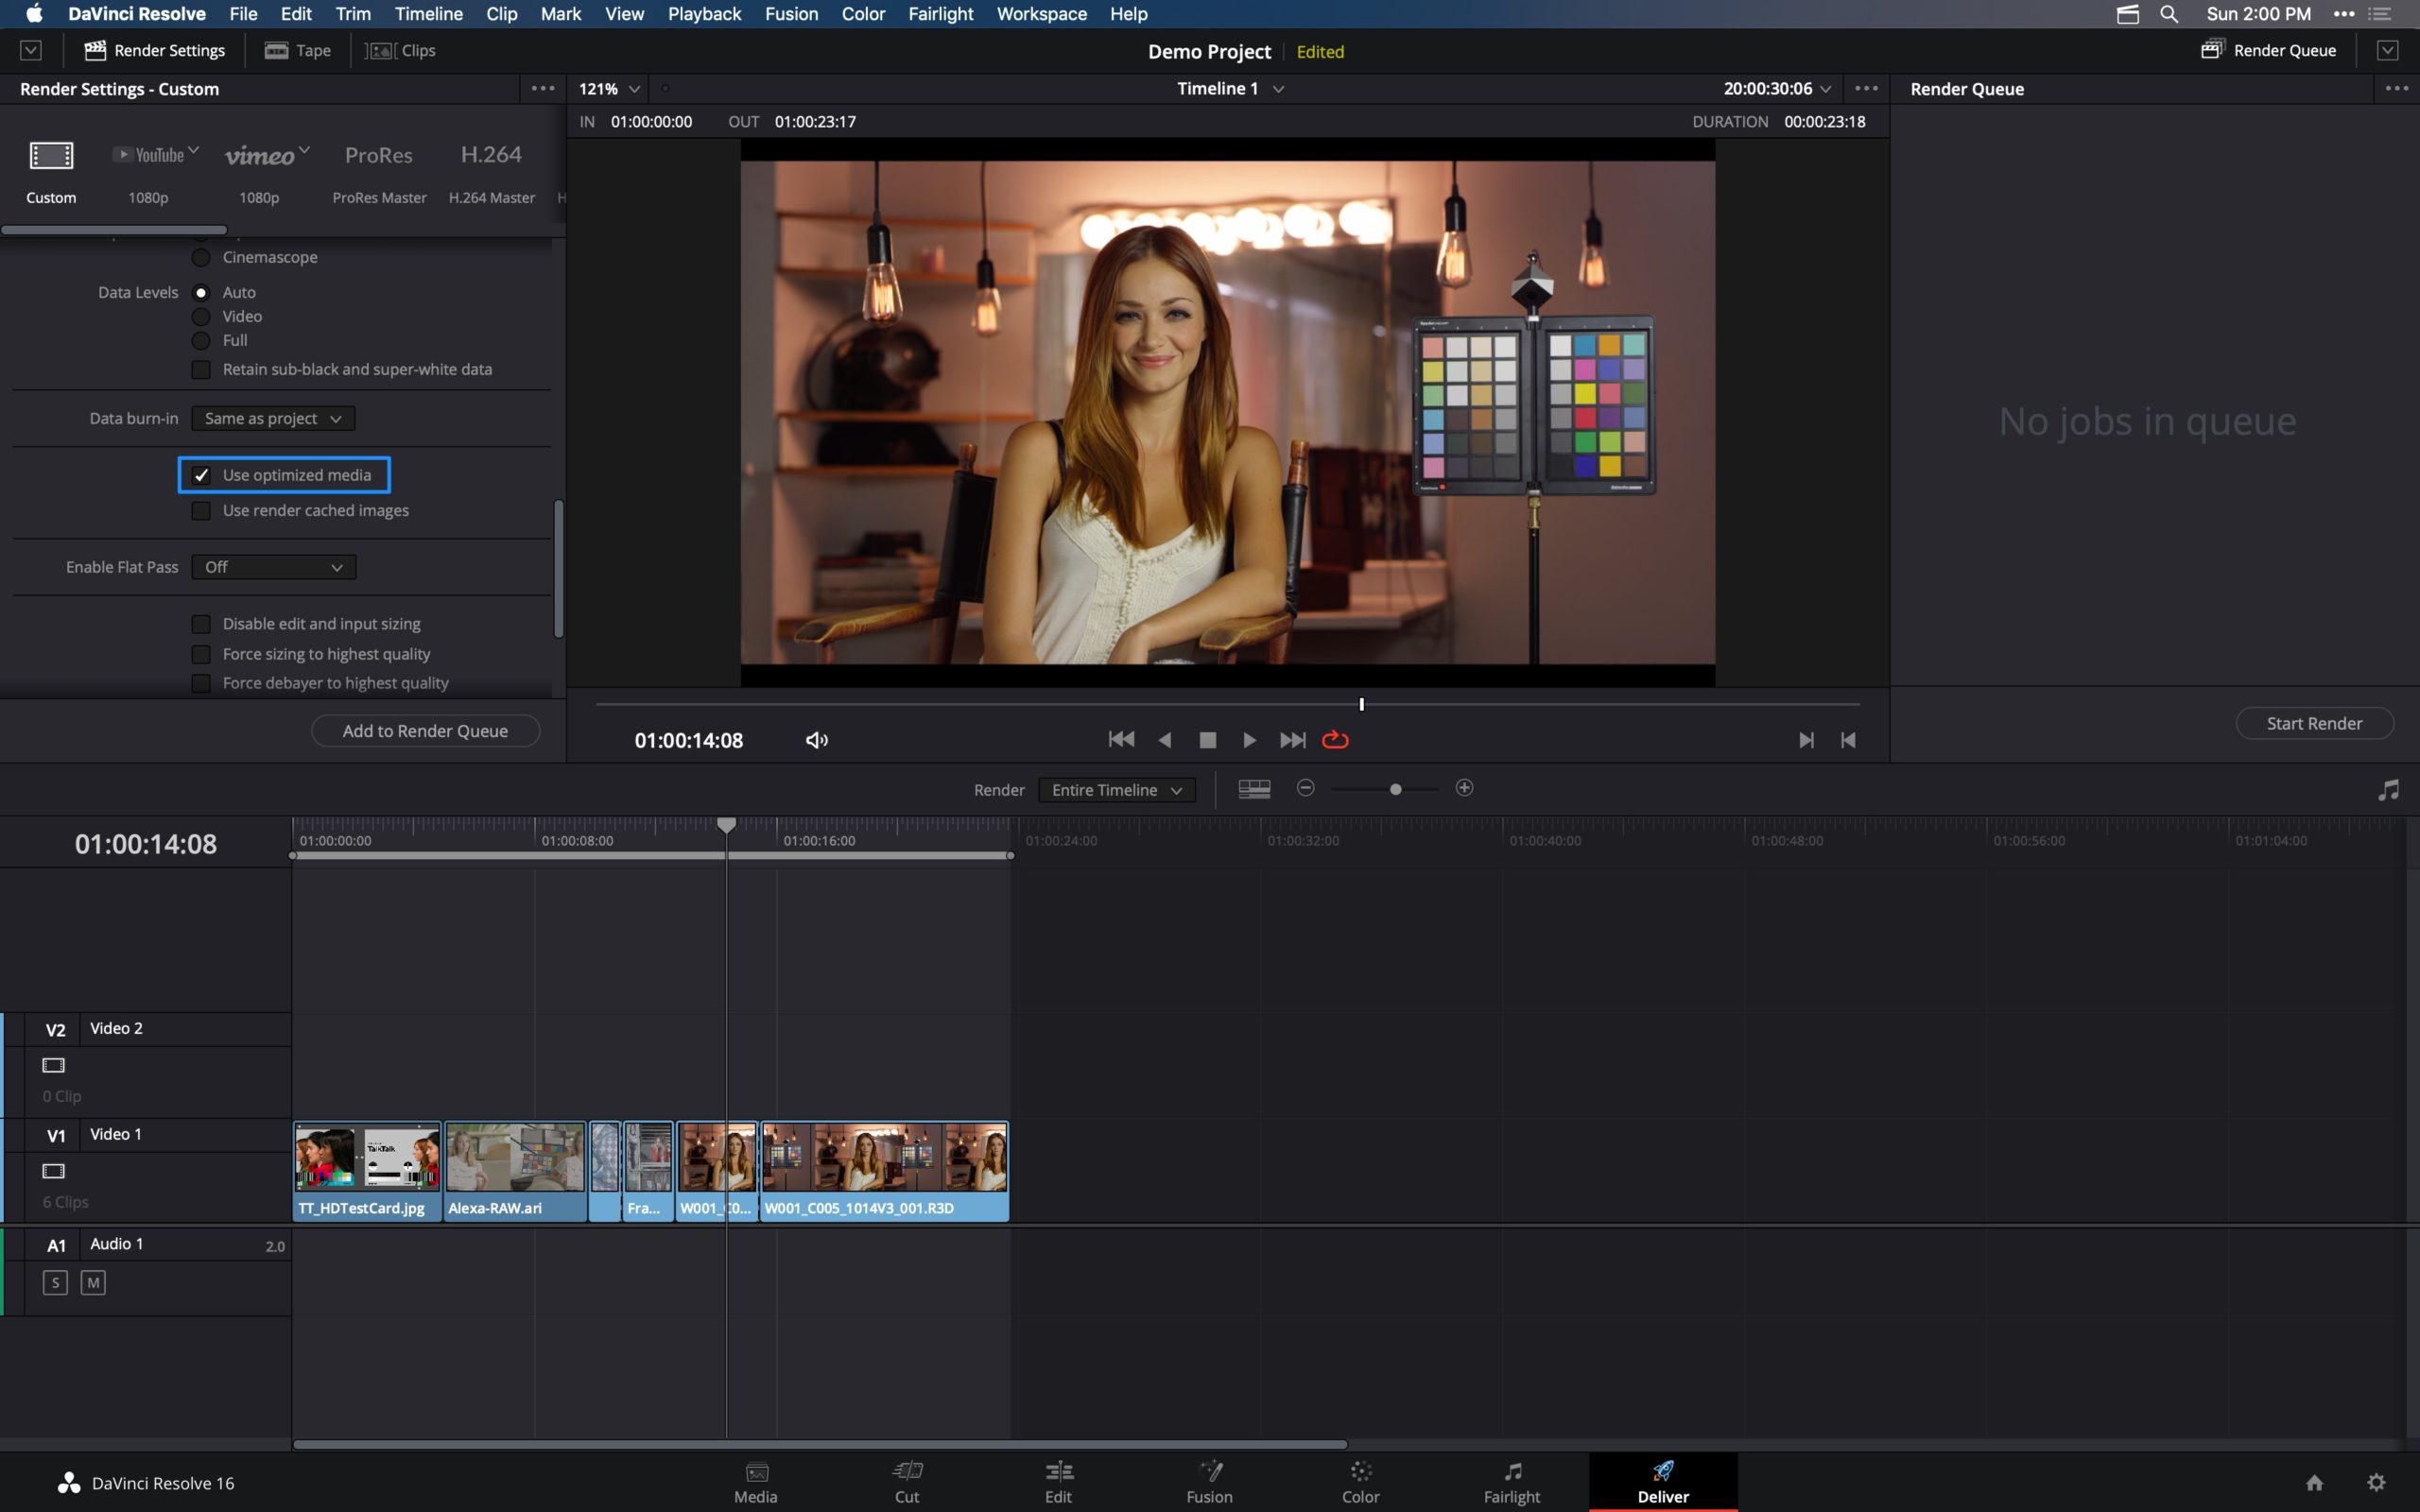
You can even force Resolve to utilize the Optimized Media as the source for exporting a "review" screener, like you might upload to Frame.io. This tin can radically improve export speeds.
These settings live in the Deliver tab. Just check the "Use optimized media" choice in the "Custom" video options preset under the "Advanced Settings."
four. Caching
DaVinci Resolve has the ability to enshroud, or "pre-render," its unabridged timeline to a more than processor-friendly format with all the edits, color grading, and effects "burned-in" to a unmarried stream of media.
This typically results in smooth, seamless playback, though it comes at the expense of render times and storage space.
Despite the added render requirement, caching can help with a diverseness of the issues we've discussed already, from processor-intensive media to an effects heavy timeline, and can fifty-fifty help your aging workstation achieve real-time playback.
On the edit folio, you tin can encounter if clips are cached past the red bar that appears along the lesser of the timeline ruler. A blueish bar indicates the clip has been successfully buried, while a red bar indicates the clip has yet to be cached.
On the colour page, you will notice similar red and blueish indicators on the nodes. These indicate that a specific node is cached.
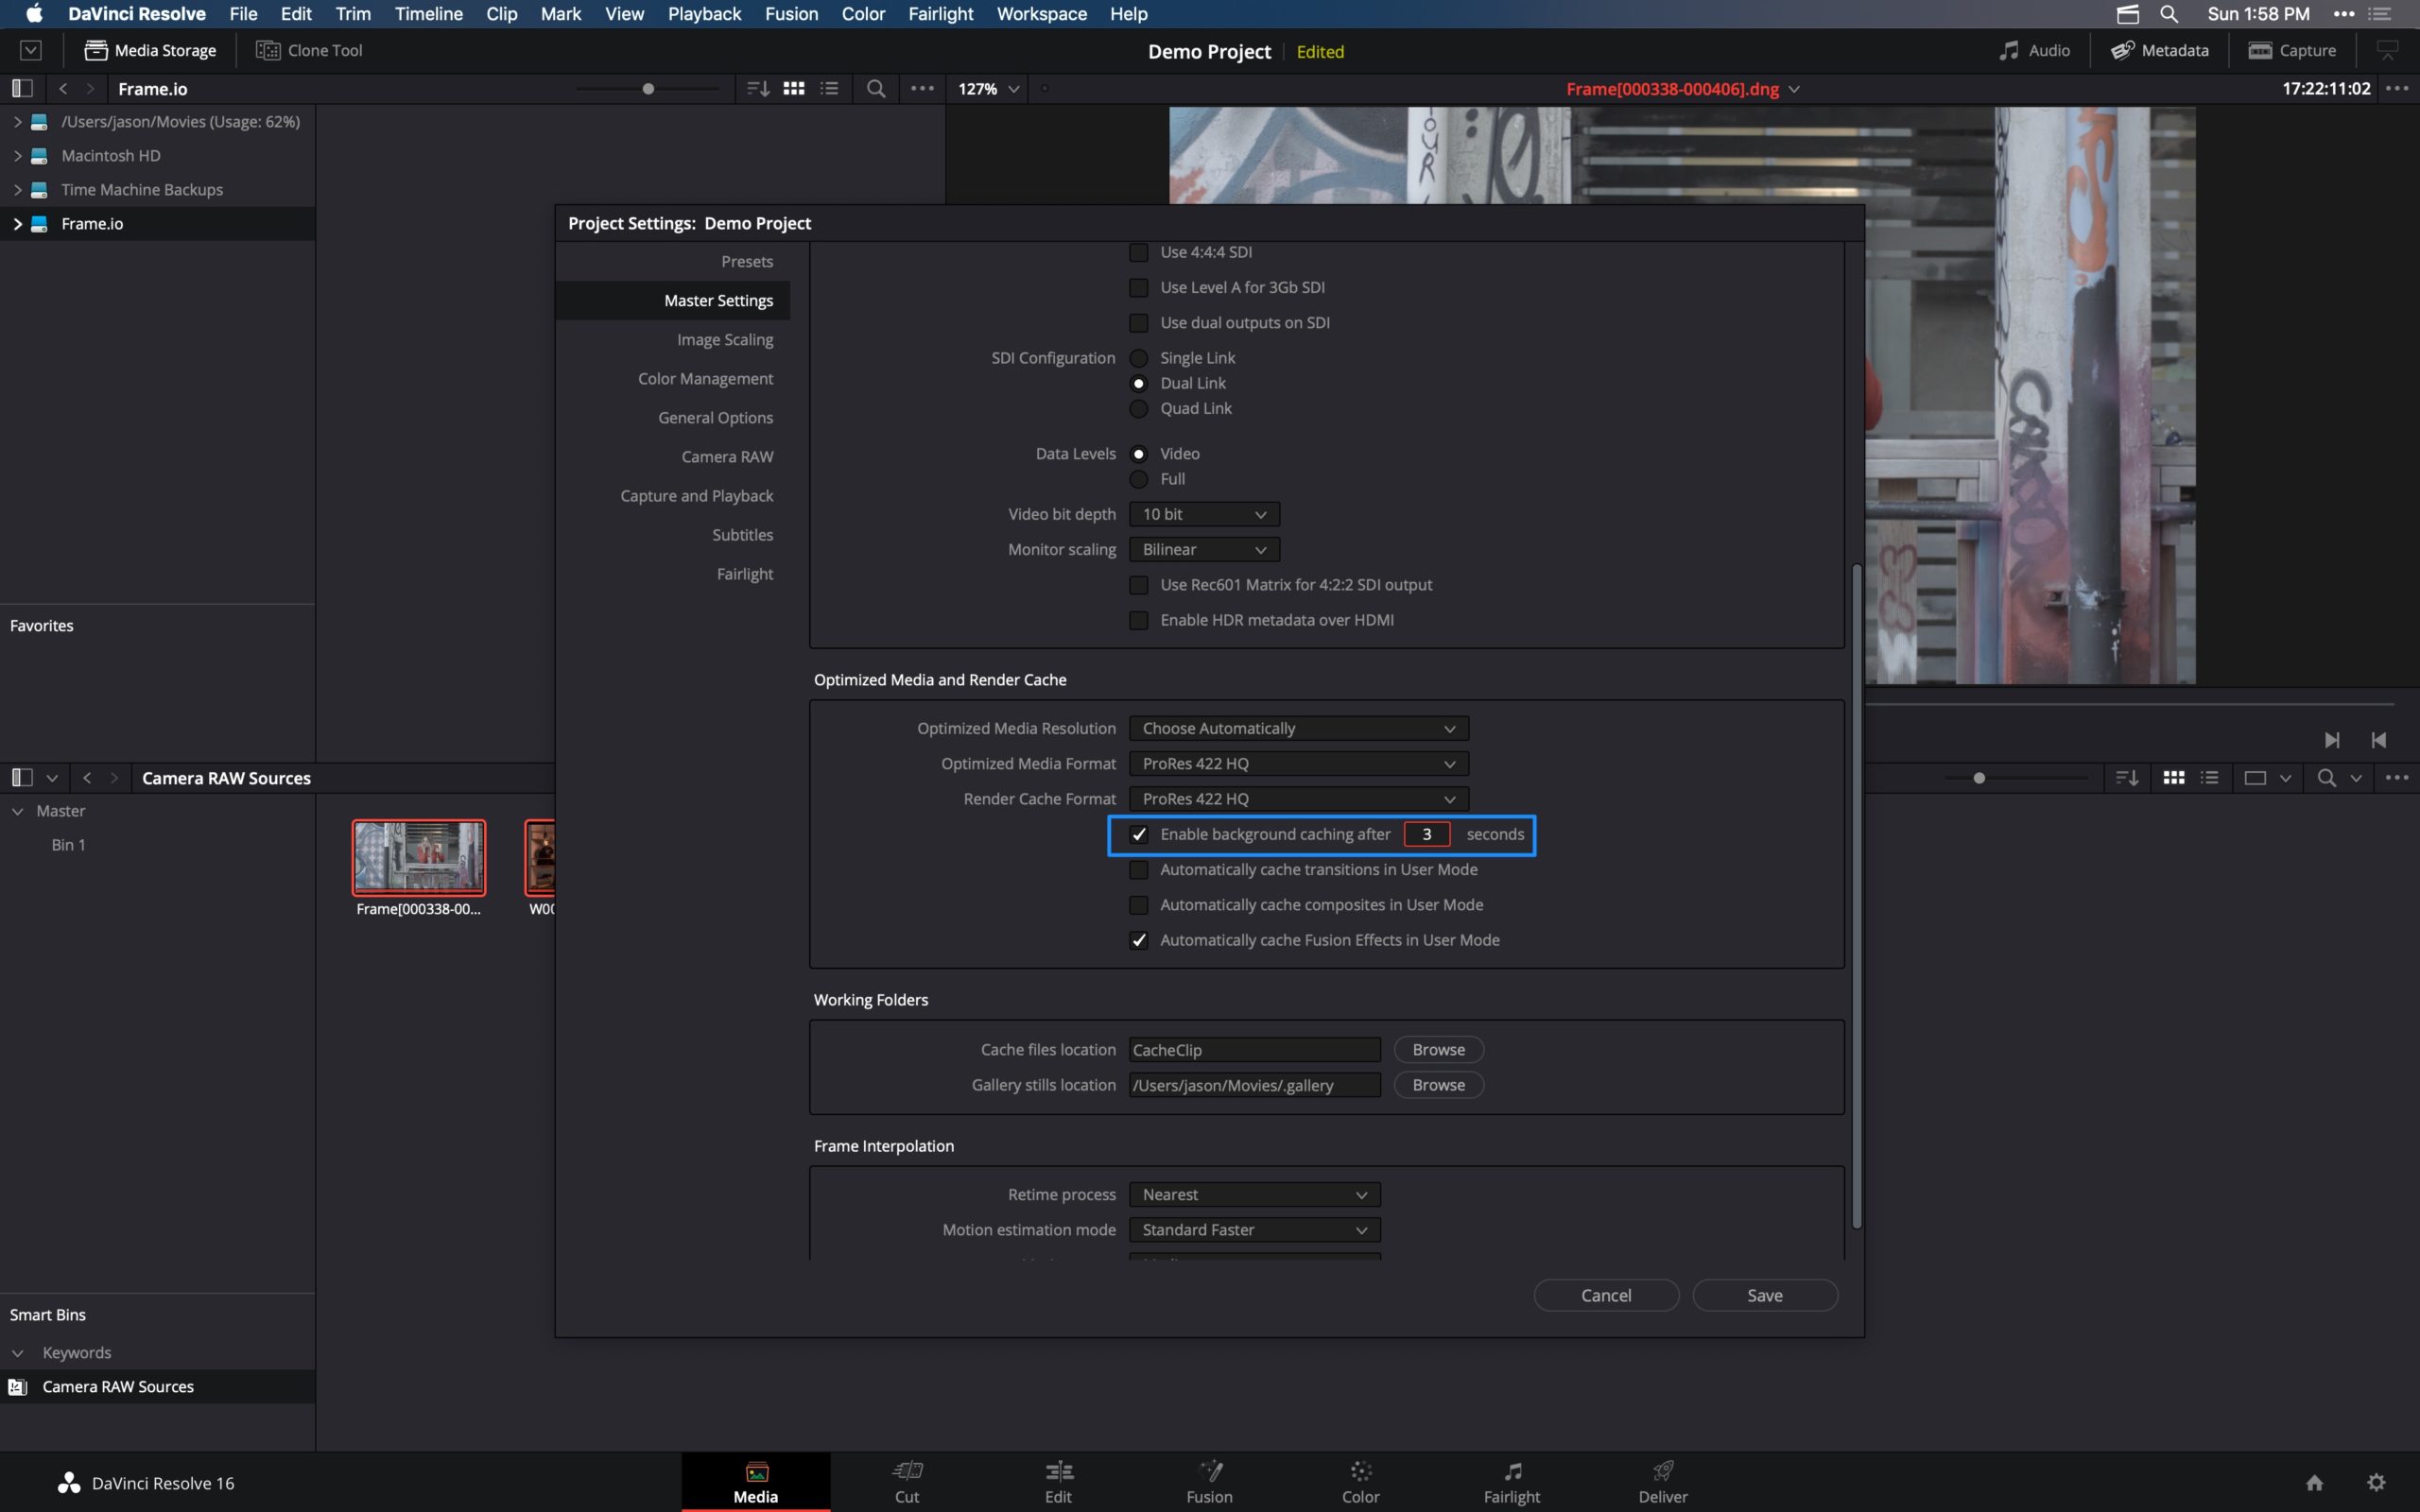
You lot'll notice caching occurs whenever you manually play back uncached clips (marked in carmine). A feature chosen Background Caching will likewise kick in whenever the computer is idle for more than 5 seconds.
Y'all tin adjust the settings for caching within the Projection Settings Projection Settings > Master Settings > Optimized Media and Return Enshroud).
At that place are two primary options for caching: Smart Mode and User Mode.
Smart Fashion provides a "fix-it-and-forget-it" style of caching, which automatically enables caching for known performance-intensive media and furnishings, while still providing some manual control over caching on individual nodes.
With User Way, caching isn't set up automatically, and leaves the caching process up to y'all.
In that location are likewise some adequately advanced workflow settings, such equally utilizing the "Return Cache Fusion Output." This setting pre-caches raw media at the timeline resolution in addition to the full quality resolution, and which avoids having to debayer the media during output.
five. Combine and conquer
One of the virtually powerful aspects of these features is they don't demand to exist used independently of each other. You lot tin easily combine several of these features to optimize your workflow and obtain real-time playback.
For example, you may create optimized media of your 4.6K BlackMagic raw media to improve their playback, while temporarily using proxy style to improve performance of the UHD timeline. Yous can so add caching into the mix to improve the performance of clips with temporal noise reduction and third-party OpenFX effects practical.
Each of these five tools and strategies functions well on their ain, just tin can be combined for greater consequence when needed.
Decision
As you can run into, DaVinci Resolve is non a one-trick pony in terms of functioning optimization. It offers a variety of features and settings that y'all tin fine melody for your specific figurer or workflow.
If you try 1 feature and information technology doesn't work, exist sure to try one of the others, and don't forget to mix and match. Resolve is an incredibly adaptable awarding, and with these features you lot can realize your creative vision even if you don't have a maxed-out Mac Pro.
Do yous use any other functioning hacks in DaVinci Resolve? Let u.s.a. know in the comments.
Source: https://blog.frame.io/2020/02/24/davinci-resolve-performance/
0 Response to "How To Make Davinci Resolve Playback Smoother"
Post a Comment